A2USB: Apple II USB & Mouse Interface Card Emulation

What does an Apple II VGA Card, a Z80-CPM SoftCard and an USB-Apple II Mouse Interface Card have in common? Well, almost everything. All three are the same card. Same hardware. Just differing software. The magic of software-defined hardware. It can emulate many things. It just depends on software.
I started a project to add USB support to the Apple II - extending the PICO-based Apple2 VGA cards. The cards are based on excellent work by Mark Aikens, David Kuder and others. The hardware is using the surprisingly powerful and flexible PICO microcontroller. The first and most obvious application of the A2USB project is a complete Apple II Mouse Interface Card emulation, supporting a USB mouse.
Background
Recently I installed an A2VGA card, adding VGA output to my Apple II. As others in this forum, I used through-hole PCBs by Ralle Palaveev - since these are easier to tinker with than SMD boards. A nice extension to my trusty green phosphor CRT. The machine already had Ethernet + MicroSD connectors (DAN ][ Card). In another post I mentioned "probably USB should be next". Well, I wasn't joking...
If you look at these A2VGA cards - using the PICO Microcontroller. It already does have an USB port. Look, it's right there:

If you have such card, you have already used this port to download the firmware to the PICO. But the flexible PICO comes with built-in USB Host support, so it can also act as a host controller. You can connect USB slave devices, like keyboards or mice. Just a bit of software is missing to make it all work and add USB support to the Apple II.
Apple II Mouse Interface Card
The first and most obvious application of A2USB is the emulation of an Apple II Mouse Interface Card. This card was introduced in 1984 (40 years ago! Happy Anniversary, Apple II Mouse Interface Card! :) ), shortly after the first Mac was launched. It consists of a peripheral interface adapter (PIA) MC6821. Cards were also made using compatible Rockwell 6520/6521 PIAs. And it has an MC6805 microcontroller as a slave device.
The microcontroller monitors the mouse buttons and movements and communicates with the Apple II's 6502 through one of the PIA's 8bit ports. It's using a very simple command based protocol: the 6502 sends commands, the slave controller responds with the requested data.
The card also has a 2KB ROM, which is mapped to the slot's 256byte address window. The ROM is split into 8 pages, which are also selected through I/O ports of the PIA. The ROM contains the necessary driver routines to communicate with the 6805 slave controller. Its interface routines are neatly documented in Apple's Mouse Interface Card manual, including programming examples in BASIC, assembler etc (oh, the good old days...).
The original Apple II Mouse Interface Card design:

If you followed the "DAN][ Controller" topic in this forum, then the overall design will look extremely familiar: it's the same concept. The DAN][ card just uses (slightly) different components, like the 8522 PIA (instead of an 6821/6520) and a modern ATMEGA instead of the MC6805 microcontroller. The solution using the PIA-controlled paged ROM is basically identical. (Sure, the DAN][ connects SDcards, not a mouse, but you get the idea.)
Behind the Scenes: How A2VGA & A2USB firmware works
If you're not interested in the implementation details, skip this section. You have been warned... :)
Emulating the Mouse Card on the PICO/A2VGA boards is mainly a matter of combining existing software - elements of Mark Aikens's and David Kuder's original VGA firmware and the stock PICO "tinyUSB host library". And, of course, the emulation of the PIA & Mouse Interface Card itself.
- The basic Apple II bus interface remains almost the same. The original VGA firmware uses two of the PICO's I/O slave units (PIOs) to monitor and control the GPIO lines connecting to the Apple II bus. The PIOs are simple programmable state machines. They have no memory, just a few registers and I/O instructions. But they are extremely fast and can execute one instruction per clock cycle - no matter what (every 4ns). They don't suffer from execution jitter, like random cache effects, as all modern ARM (or x86) cores do. The PIOs guarantee that the GPIO lines comply with the 6502 bus timing. Once the PIOs detect a relevant READ or WRITE bus operation, they pack the bits into a single 32bit message (containing address + data + control bits) and forward the request to the PICO's main ARM CPU.
- One of the PICO's ARM cores only takes care of processing the incomming READ/WRITE requests. Reads are most critical, their result must be ready within about 400ns. And it takes about 70ns before the PIOs have captured and sent the data. That leaves about 330ns for the ARM to respond. Not much. So the software needs to be quick, quick, quick... Forget about C++ and complex SW abstractions. This core has a typical "real-time constraint". Everything must be done in less than 100 cycles when processing a read request. Write operations are slightly more relaxed, since the PIOs are not waiting for a response. So we have almost an entire microsecond, before the next request could arrive (since the 6502 is running at 1MHz).
- This core takes care of the ROM emulation. This is easy. The Apple II Mouse Interface Card's 2KB ROM is just an array, where we need to look up and return a single byte, whenever the 6502 made a matching read request. We just need to consider the 6502's slot address (8bit offset) and the selected ROM page (since the 2KB ROM is divided into 8 pages). No problem to squeeze this into a couple of instructions.
- The same core also takes care of the PIA emulation. This is almost as easy. The 6821/6520 PIA just has a couple of simple data and control registers, which can be read & written.
- The second ARM core originally generated the VGA output data (or did the Z80 emulation, when using the Z80 SoftCard firmware). These parts are no longer needed for the A2USB firmware. Life on the PICO's second ARM core is much more relaxed with A2USB. It just needs to run the PICO's "tinyUSB host" library, which comes with support for "HID devices" (Human Interface Devices) like mice or keyboards.
- Finally, this core also emulates the MC6805 microcontroller. This is not done on CPU instruction level, which wouldn't make much sense, since we don't connect an original Apple II mouse anyway. Instead, the software just emulates the original communication protocol. It implements the same commands like the original and provides the same responses. And it talks to the first ARM core through the emulated PIA registers (just data in shared memory).
This is how the design of the A2USB firmware looks:
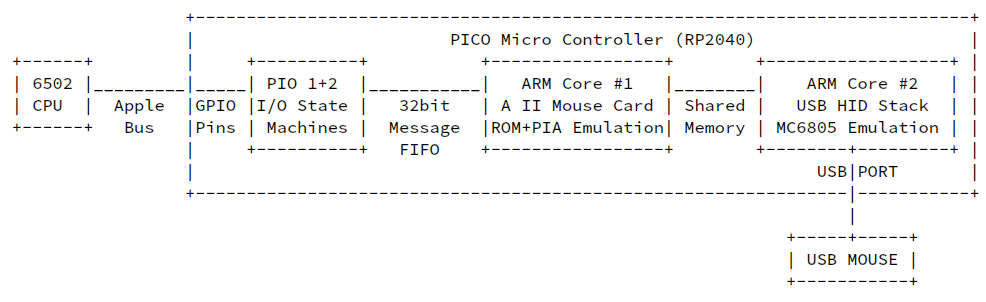
It's pretty cool but also slightly frightening to see that current tiny lower-power microcontrollers have become so powerful, they can just connect to the 6502 bus with "bit-banged" GPIO lines. And they are fast enough to run entire software routines for every single 6502 CPU cycle. And just for context: the RP2040 currently costs 80cents - much cheaper than the good old ATMEGAs (an entire PICO PCB module costs about 4-5 bucks).
Hardware Requirements
If you are interested in adding an "USB Mouse Interface Card" to your Apple II, here's what you (currently) need. Remember, the project is at an early stage. Right now, a bit of tinkering is needed to apply some modifications. If you don't like tinkering and testing, better wait until updated PCBs are available - and the firmware has been tested on more machines:
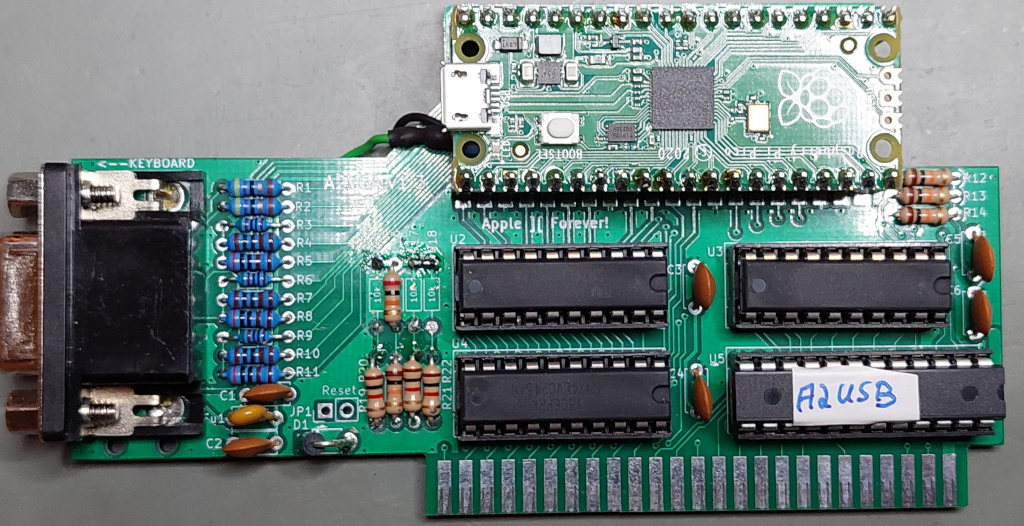
- 1. You need a PICO-based A2VGA card. I used the DIP IC PCB variant by Ralle Palaveev. David Kuder's original SMD PCBs should also work. The GAL/PAL needs to be on the card.
- 2. You need an MicroUSB adapter cable. You probably want a "USB-type-A socket", so you can connect a traditional mouse:
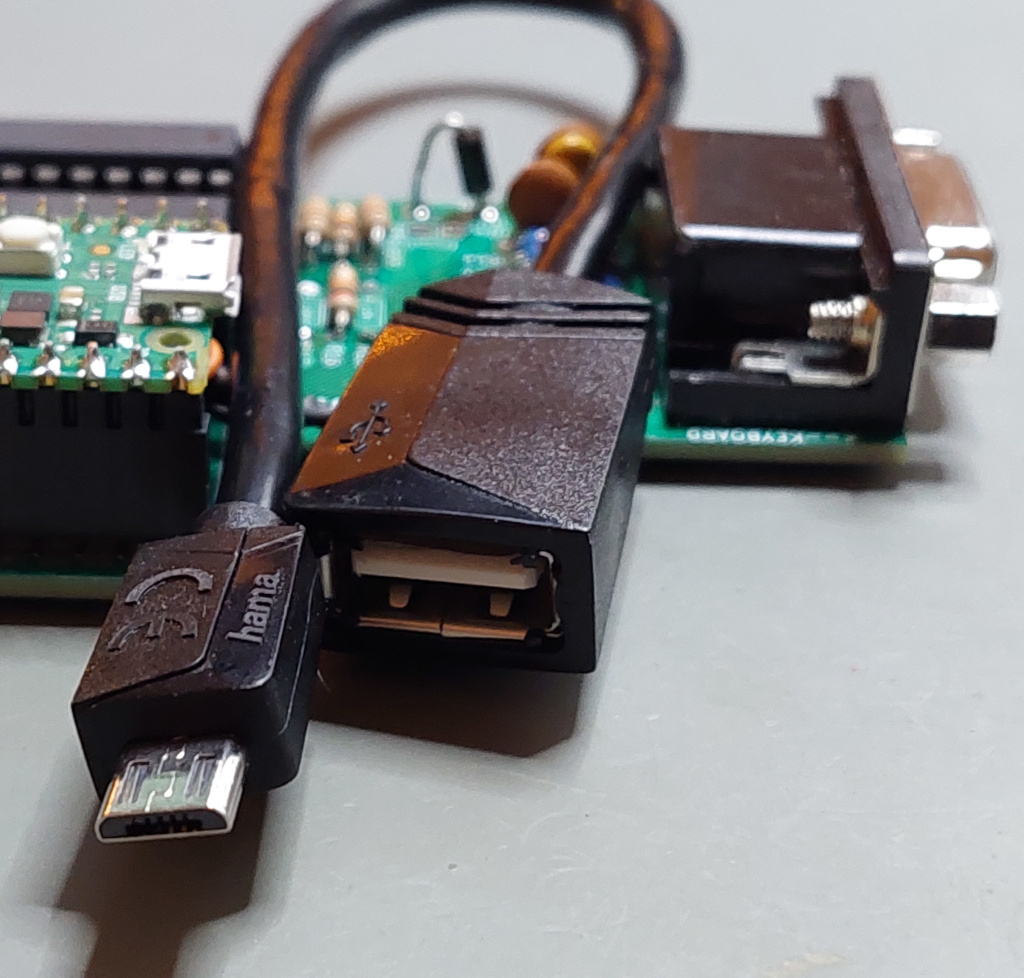
If you soldered the PICO directly to the PCB, try to get a cable with really thin plug. I got one with a very thick plug (the plastic is almost 7mm high), which doesn't fit mechanically when the PICO is directly soldered on top of the Palaveev PCBs. Otherwise, if you make new boards, make sure to use pins to provide at least a few millimeters of clearance between the PCB and the PICO module. Clearance isn't an issue with David's PCBs, due to his different design (PCB doesn't protrude below the MicroUSB port).
The adapter cable is also nice, since you can route the USB socket through an opening in the back of your Apple II. Your Apple II now comes with an USB port! Wohoo! :)
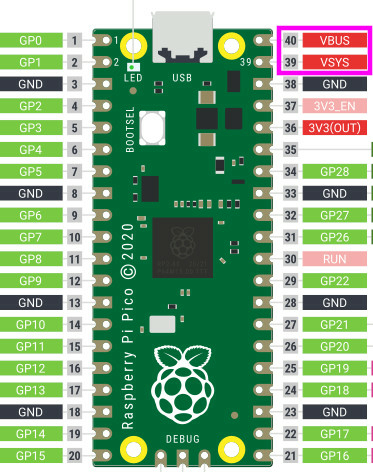
- 3. To enable "USB Host" support for the PICO module, you need to connect the two VBUS and VSYS pins of the PICO module. The PICO module has an onboard Schottky diode, which allows the PICO to be powered through the MicroUSB connector - however, it prevents power from flowing in the other direction. A slave device like a mouse needs to be powered by the PICO, of course. So, two pins connecting the diode need to be bridged to enable "USB host" support.
Be careful: never plug a power SOURCE (like a Laptop) into the PICO's MicroUSB port, while the PICO is plugged into the Apple II Slot (no matter whether the Apple II is switched on or not).
Here's the two pins which need to be briged (VBUS+VSYS, pins 39+40):
They are easily bridged on the bottom of the A2VGA PCB:

- 4. Oh, here's a catch. The Apple II Mouse Interface Card has different operating modes. In the simple case it is used in passive mode (polling). This is used by simple applications, like anything implemented in BASIC. This mode will work right out of the box. No problems, no additional changes required.
However, sophisticated software uses interrupt modes. These cannot work with the current/original A2VGA cards, since they lack IRQ support. I added this to my cards, using an GPIO pin which is normally used for VGA VSYNC output. Since VGA output is not active, of course, when the A2USB firmware is used, this pin is available.
Adding this to the card is simple. Ideally, when new PCBs were made, these should have a jumper to connect/disconnect the IRQ (as shown), so you can select if you want VGA output or USB/IRQ support:
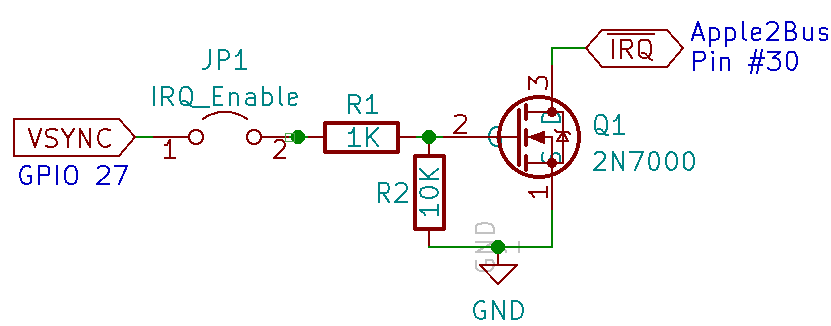
Just two resistors and a MOSFET. I simply rigged these to my A2VGA cards:

Added heat-shrink...

... and stuffed it below the PICO on my "development PCB" (with pin headers). It's almost invisible - from the top...
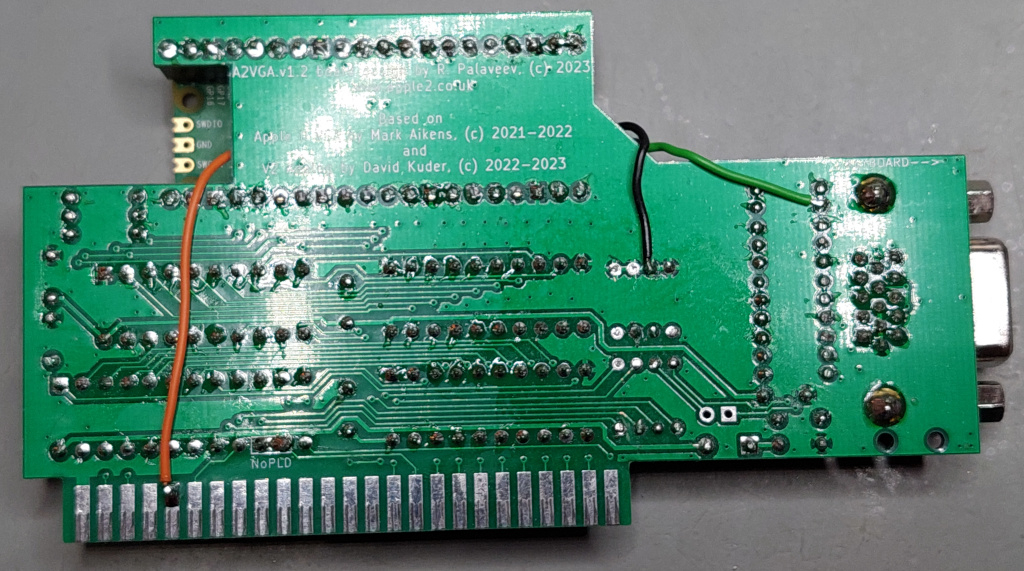
Yes, you currently have to solder a wire directly to a slot pad, since no connection pad was prepared. But they are large enough. Just make sure to only solder the top tip of the pad. The scratches from the slot connector show how much space you have.
- 5. Finally, install the card in your Apple II. Use slot 4. The Mouse Interface will work in any slot. The ROM and everything was made to be slot independent. However, many of the sophisticated programs, like MousePaint, just come with hard-coded "mouse in slot 4" support. So only slot 4 makes sense. (Yeah, not everything was great in the old days. Some programmers have always been lazy...)
New PCBs?
I currently do not plan to create a new/specific PCB design just to add IRQ support. There are already various variants of the A2VGA cards out there. Ideally, IRQ support should be added to existing PCB projects. It's just three tiny components, which barely take any space. The jumper to enable/disable the IRQ (switch between USB/IRQ and VGA support) could be a tiny solder-jumper.
I'll probably contact authors of existing PCB designs and ask if they were interested in adding an IRQ option. I think this would make those cards even more attractive. When you order PCBs, you usually receive a batch of them anyway. So you build one as an VGA card, one for Z80, one for USB/Mouse - and well, let's wait and see what else the card can do... :)
Testing and Future Work
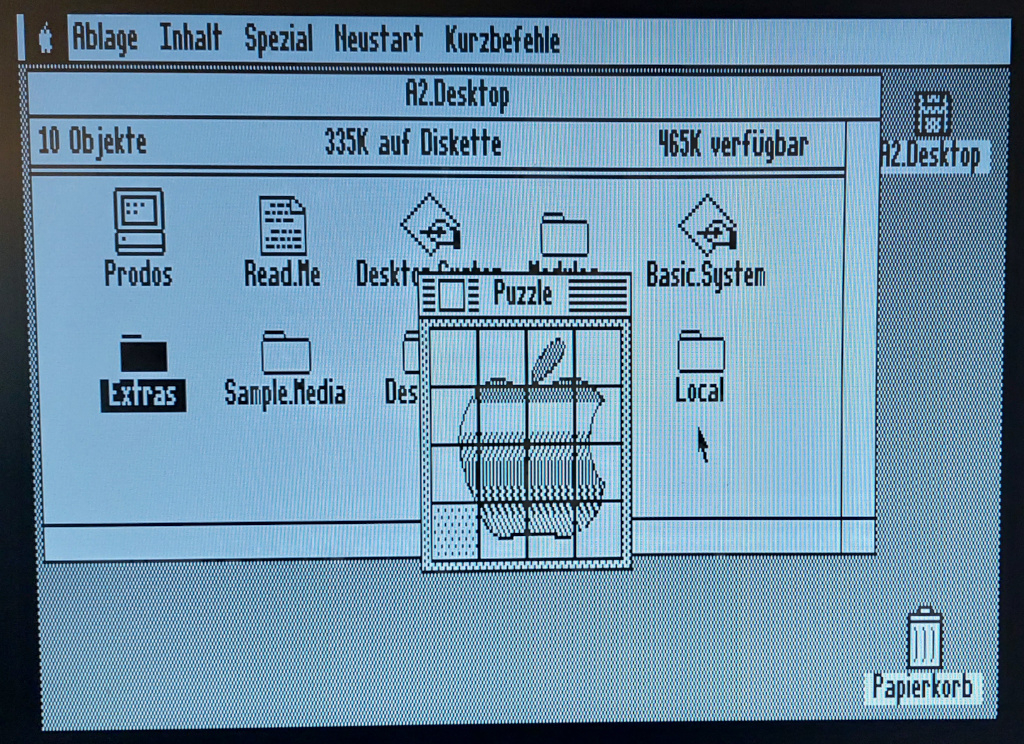
The new firmware finally works well, is stable (on my machine). I have a disk with several tests for the API commands. I also tested with several applications. Works great. And the mouse is surprisingly smooth on the Apple II.

... and just as well with A2Desktop:
However, more testing is needed. And probably a few more tweaks to make it work on all kinds of machines:
- As usual, initially I ran into unforeseen issues. The firmware was basically working early on, but it just wasn't stable. For the MouseCard to work, every single read and write operation has to be perfect. When you use the card just for VGA output, chances are, you'd barely notice when the card very occasionally missed a single read or write cycle. But when the card is emulating the ROM (= instructions to be executed by the 6502) and a bidirectional communication protocol - then everything needs to be absolutely flawless. And single hickup and the 6502 will not be happy/get stuck/do weird stuff...
- My first assumption, of course, was that the code on the main cores still wasn't fast enough. But it turned out to be an issue with the PIOs, which control the bus interface to the 6502. Eventually I slightly delayed the timing when capturing the address bus by a few nano seconds. And I slightly moved the output timing, so data for read operations is written slightly earlier to the data bus. And, voilà, suddenly everything was 100% stable. On my machine...
- This needs more investigation - and testing on other machines. Also, I noticed just now that Mark Aitken's original Apple II VGA project contains reworked PIO code - to "improve bus timing" and to "fix compatibility issues". It's worth comparing the changes between the different projects...
Installation
- Download A2USB Firmware here: https://github.com/ThorstenBr/A2USB/releases
- Remove the PICO (or entire A2VGA card) from the Apple II (!)
- Connect the PICO's USB to your PC/MAC while pressing the BOOTSEL button.
- Drag & drop the A2USB firmware file A2-USB-MOUSE-4ns.uf2 to your PICO.
- Wait a second.
- Disconnect and reinstall in your Apple II. Route the USB adapter cable through an opening in the back. Connect a USB mouse directly (sorry, no USB HUB support yet).
Mouse & More
The Mouse Interface Card is one application for using USB. Other applications are obviously also possible. After all, it's a software-defined interface card for the Apple II.
It's going to be an interesting platform for further extensions...
Many thanks to the original creators of this flexible PICO platform for Apple II - and the various variants and PCB designs (Mark, David, Ralle, ...).
Apple ][ Forever!
Happy 2024!
There is a separate discussion in the forums on this topic.
- MacFly's blog
- Log in or register to post comments
Comments
Awesome!
Really great work!
Now I need to build some more cards! Hopefully with the mods already done, but in the mean time i will hack one I've already built.