The Pig Skin PDQ: eliminating the Wallstreet's scratched rubber
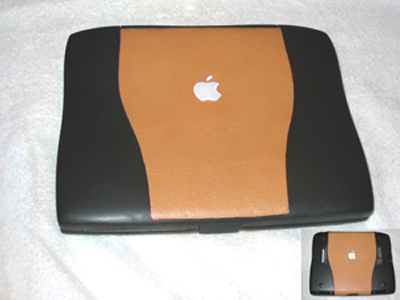
Hi I noticed that there hasn't been any new Wallstreet Mods on here for a long time. Here's proof that the Wallstreet isn't dead. Mine is alive and well, with a new 'facelift' to boot with! I decided to call it the Pig Skin PDQ, because it is a PDQ revision and because of the quality and texture of the leather I chose, reminded me of some high quality pigskin leather suitcases I own, (no I didn't chop on up my suitcases either to obtain the leather. I bought it because it matched the interior of my car, for repairs to it and this leather was what I had enough of around to use for this purpose at the time. Beside I have always been partial to tan leather.
Well, I finally got tired of the worn out, old and scratched up looking rubber center section of my G3 PDQ that was otherwise in excellent condition. This is my very favorite all time Macintosh PowerBook and I have long wanted it to look new again.
This being my first computer Mod, I actually took a couple of years of studying pictures of other Mac Wallstreet Mods off and on before getting up the courage to do this. I first wanted to try to paint over the center rubberized section. Not being able to figure out exactly what type of paint would be used though for this type of work, I decided to cover the rubber areas with leather. Once I had laid thin paper over the center area and carefully traced out the outline and made a pattern, I realized that simply gluing leather over the rubberized area would look downright awful.
I went back and carefully read through everyone's Wallstreet mods on Applefritter. I liked best the basic method described in [The BatBook: A PB G3 Cosmetic Mod] Written by Russell Walks on Wednesday, 15 September 2004 I decided to take the risk and remove the rubber along with the entire metal layer underneath it all at once!
This proved to be much more difficult than I thought it would be. I had a great deal of difficulty just getting the very first edge of the metal lifted. I used a wide and pointed letter opener to dig under the back corner of the rubber coated metal. Once I had managed to lift a tiny corner, I knew I was at the point of no return. My PDQ would never look the same! I proceeded to use a syringe and carefully drip a tiny bit of nail polish remover at a time along the seam of glue that bonded the metal to the plastic bezel of the PDQ.
I started with the removal of the underside or bottom section first. The first scare came when I realized that there were a series of holes through the plastic that were manufactured there as places for the logic board's mounting screws to be anchored. I was terrified that I might have dripped nail polish remover into one of more of these holes! Oh well too late if I did do that, I thought, so I wiped the holes with a tissue and continued with the difficult business of gently prying off the metal.
Scare number two came just a few minutes later when I heard a loud crack and my heart sank... What I feared had happened! I had managed to crack the bottom bezel. It was a clean crack about 3 to 4 inches in length that went crosswise from side to side right across the bottom of the PowerBook's underside. I knew that as it was a clean crack that It would be easily covered when it came time to glue on the leather. What really worried me was the thought that perhaps the logic board had been flexed and destroyed as a result of the flexion of the bezel when it cracked.
I couldn't stand it, just wondering, and worrying! I halted the peeling operation and connected the AC Adapter and crossed my fingers and pressed the power key. Needless to say I was relieved to hear that comforting start up chime.
After powering down again, it was again time to continue with the 'skinning' of my dear old friend. I found it far easier to place the PowerBook up on end on my lap with the hinge facing me to peel off the metal. Even though the nail polish remover was in use I still had to use quite a lot of force to get the bottom metal panel free. I became so engrossed in this process that it wasn't until I felt a cold wetness on my lap that I realized to my horror that the nail polish remover had somehow worked its way down under the center of the metal section and escaped out along the front which was now at the bottom since the PowerBook was being held on end.
Knowing the damage that nail polish remover can, (no WILL) do to plastic, I quickly wiped off any I found, but some damage was done to the top edge of the screen's bezel. The damage amounted to a faint whitish grayed area. l discovered though much to my relief, that if I sprayed a bit of WD40 into a soft cloth that I was able to polish out the discoloration enough that it was almost totally invisible.
After this mishap, I soon had the bottom metal off. Whew! The top panel proved easier, I don't know why. Maybe the heat over the years coming through the bottom had baked the glue harder?
Regarding this top section, There were a few delicate areas to mention however. This bezel has a very thin area at the back, just in front of the sleep light that is attached by a few snaps, meaning that here too was the risk that nail polish remover might seep through to the LCD inside. The extreme thinness of the plastic here made it very difficult to remove the metal without flexing the top bezel, so extreme caution was required here.
The next surprise came when I reached the white plastic Apple in the center of the top panel. I thought this white Apple logo was assembled by being attached from the inside, but it is not , instead it is attached from the outside and then the metal is glued on top of it. The nail polish remover had dissolved any glue that attached it too, so it came right off cleanly. Another disappointment was that although the hole around the Apple Logo in the black plastic bezel is round, the White Apple logo is flat along the bottom edge of it meaning that there is actually a small hole between the bezel and the Apple logo on the bottom of this logo. I cannot understand why Apple would design a part to fit so poorly.
I heard another loud crack as I was almost done peeling away the metal from the top bezel. Much to my relief, this time it was the glue releasing all at once when only a strip about an inch and a half wide still held it attached to the bezel underneath it.
Okay, so now I had the leather cut and the metal with its worn out & scratched up rubber attached to it completely removed. I used Contact Cement applied with a small paint brush as the glue of choice. But first I applied a strip of black electric tape, (because its very supple and flexible) to mask it along the edge of the bezel's curved lines in case I over applied any glue. I was able to apply the leather almost as fast as I finished with the application of the Contact Cement, with only a few minutes wait and the paper test to ensure that the glue was dry enough before putting it altogether.
I was so engrossed in actually doing this Mod that it wasn't until I was done that the thought of taking a picture and posting about it on Applefritter occurred to me, so I must apologize for that.
Just a small note to confirm the success, of this Mod, I want to mention that this article was written on this 'Pig Skin PDQ' as well as posted on here using it as well, so the operation was a success!
Many thanks to Russell Walks, for his walkthrough of this process.
Erikthefinn.
| Attachment | Size |
|---|---|
| 96.88 KB |